Happy Friday! I worked on some more projects using Echo Park to try out for their Fresh Faces Designer Campaign. This is a long and photo-heavy post! But I hope you'll enjoy. Here are the projects:
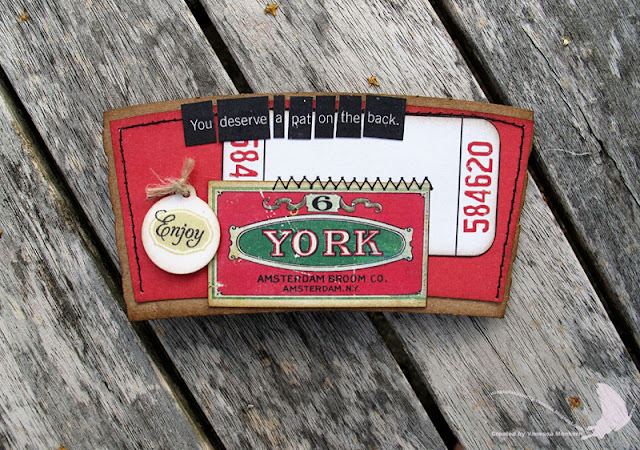
1. Personalized Coffee Sleeve
I altered a Starbucks coffee sleeve using various papers from the For the Record Collection. The edges of the sleeve and the papers are inked with distress ink. The sentiment is cut from the Noteworthy sheet.
2. Witches Brew Card
I couldn't resist using one of the new digital die-cuts from iDIECUT here. Isn't this witch silhouette the cutest? I had to stop myself from buying ALL of the files! The sentiment is stamped and heat-embossed with black embossing powder. The papers are from the Apothecary Emporium Collection paper pad.
3. Seed Packet Pocket Book (with tutorial)
Wouldn't this be a perfect gift for a friend with a garden? I used papers from the Victoria Gardens and Happy Days Collections here. The butterflies and flower images are stamped and colored with Copics. And I have a little tutorial for you about how to make this book. It is so versatile, you could make it a recipe book, a tag book, a coupon holder - it's up to you! Here comes the tutorial (just click onto the photos to enlarge) :
Cover
1. Trim cardboard as shown.
2. Trim patterned paper to be about 1/2 inch larger than cardboard on every side. Adhere cardboard and trim edges as shown.
3. Apply adhesive to the cardboard edges and fold down patterned paper edges.
4. Trim patterned paper slightly smaller than the finished piece, adhere.
5. Gently fold your cover to create your book.
6. Adhere either magnetic snaps or hook and loop fasteners to the lid.
7. Now your book is finished to be embellished and filled.
Inside
1. For my pockets I used plain white paper bags. You can make your pockets from envelopes, too. Just seal the envelopes and trim as shown below.
2. Trim paper bags/envelopes to 4 1/4 length.
3. Adhere adhesive to the middle of a bag/envelope.
4. Adhere to another bag/envelope.
5. Repeat until you used all bags/envelopes and adhere to the inside of your book.
I hope you liked the tutorial! Let me know in a comment if you'll give this a try, I would love to see the results! And if you have any questions, let me know, too!
Thanks for visiting and have a beautiful day!
Hugs and Love,
Vanessa
Supplies:
Coffee Sleeve
Patterned Paper: (For the Record) Echo Park
Ink: (Walnut Stain, Antique Linen) Ranger Industries
Stamps: (label, Enjoy) PTI
Die: (tag) PTI
Other: (coffee sleeve, twine)
Witches Brew Card
Patterned Paper: (Apothecary Emporium) Echo Park
Cardstock: (black) Bazzill Basics
Stamp: (sentiment) Pink Paislee
Ink: (Watermark) Tsukineko, (Black Soot) Ranger Industries
Gemstone: (orange) Prima
Digital Die-Cut: (Witch Silhouette) iDIECUT.com
Seed Packet Pocket Book
Patterned Paper: (Victoria Gardens, Happy Days) Echo Park
Cardstock: (white) PTI
Stamps: (Antique Engravings butterflies) Hero Arts, (Seed Packet Frame, Flowers) Papertrey Ink
Ink: (Tuxedo Black, Bamboo Leaves, Angel Pink) Tsukineko
Marker: (pink, red) Copic
Sticker: (borders, label, ornament) Echo Park
Ribbon Flower: Webster's Pages
Dies: (seed packet, frame) Papertrey Ink
Other: (cardboard, white paper bags, Hook & Loop fasteners)


5 comments:
OH MY! These are AMAZZZZZZZZZZING! I am totally casing these;) LOVE your coffee sleeve and that silhouette of the witch! LOOOOOOOOVE:)
Gorgeous Vanessa. I'm off to make a little folder now. Thanks for the tutorial. Also love your coffee sleeve and the card too.
wow! amazing projects, Vanessa! that coffee sleeve is so cool and i do like that witch silhouette, too. fab card. and wow! LOVE the pocket mini. thanks for the tutorial! good luck with the campaign!! hope you have a beautiful weekend! =)
This is sooo creative dear..great Idea....wie gehts dir...ich vermisse dich Vanessa...LG, Monika
Fabulous projects and a HUGE congratulations on getting picked! My posts start next week and I am pretty nervous! I cannot wait to see what you create!
Lowri :-)
Post a Comment