Showing posts with label Pinkfresh Studio. Show all posts

11/08/2017

Winnie & Walter November Release Premieres Day 2

Welcome to Day 2 of the Winnie & Walter November Release Premieres! I hope you like what you've seen so far! 

Here comes more inspiration:

For this gift wrap, I used Tagged: Holiday Cheer and the tags from the older Cutaways set Essentials: Noelle Cutaways. The cute snowflake button and the stickers are from Pinkfresh Studio.

Next up is a non-holiday card for every day, using Sentimental: Gift and Warm Wishes to You:

I just stamped all the hearts from the set using various colors and added matching enamel dots. Then I heat-embossed the sentiment onto a strip of black cardstock and adhered it with foam tape.

Now it's time to hop to the Winnie & Walter Blog for more samples and give-aways! I hope to see you back here tomorrow! Thanks for stopping by!

Vanessa

7/01/2017

Baby Card

Happy weekend everyone! I am back with a baby card I made this week. My boss is a new proud father of a little son so I needed a card.

Here is what I came up with:


I trimmed a panel of patterned paper from Pink Fresh Studio slightly smaller than my card base (the card is about 15x15 cm to have enough space for all my colleagues to sign it) and adhered it to the card. Now I die-cut the letters from fun foam and blue cardstock and adhered them. I stamped the cute images onto white cardstock, colored them with Copics and die-cut them with the matching dies. After I had adhered them with foam tape, I added the stars and the heart.

I'll enter this to the current Simon Says Stamp Wednesday Challenge: Anything Goes.

Thanks for stopping by!

Vanessa

Supplies:

5/05/2016

A Cute Owl

Hey everyone! It's my turn on the Sunny Studio Blog today and this is the card I made:


I'd love for you to check out all the details on the Sunny Studio Blog! Thanks for stopping by!

Vanessa

3/29/2016

Winnie & Walter Share the Love with Pinkfresh Studio


Hello and welcome to another Share the Love week with Winnie & Walter and Pinkfresh Studio! This week, the Designteam girls will show you projects mixing up the gorgeous Felicity Collection by Pinkfresh Studio with yummy Winnie & Walter products. They go together so well! And, besides all the inspiration, there are prizes to be won! So be sure to visit the Winnie & Walter Blog for all the details.

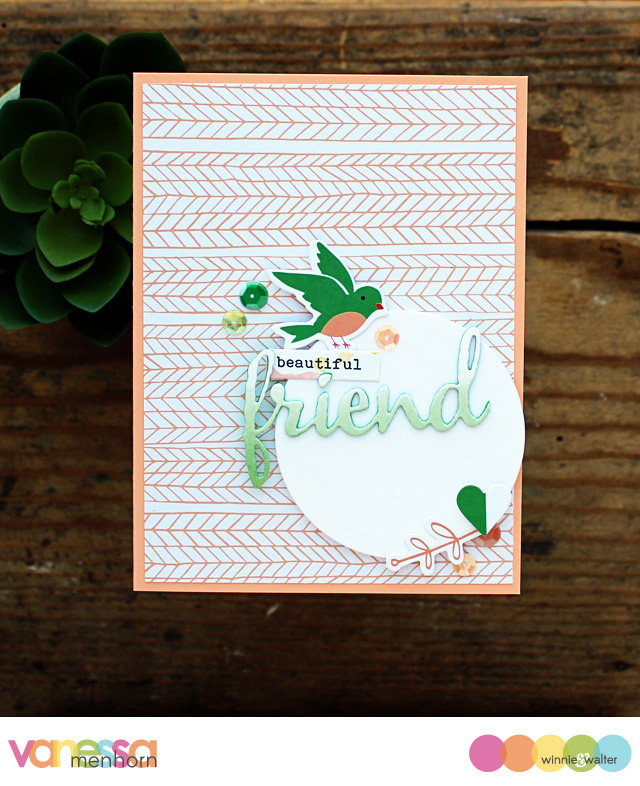
I made a fun spring card:

The little bird elements are so cute, don't you think? I started with a panel of patterned paper that I trimmed slightly smaller than my peach colored card base and adhered it. Then I die-cut the circle using the solid circle from True Multifaceted Circle Cutaways from white cardstock and adhered it with foam tape. I inked a piece of white cardstock with green ink (trying to achieve a gradient look) and die-cut the friend from The Big, the Bold and Friends Cutaways from it. Then I die-cut the word twice from green cardstock, layered the three pieces and adhered them to the circle. Now I added the bird, the "beautiful" sticker, the heart and the little branch and finished the card off with puffy Sequin Stickers and matching sequins.


I enjoyed combining Winnie & Walter with Pinkfresh Studio so much! I sure will do this more often! Now don't forget to hop to the Winnie & Walter Blog to read all about the prizes!

Thanks for stopping by!

Vanessa


5/29/2015

Pinkfresh Studio May Embellishment Kit

The sweet girls from Winnie & Walter did a cooperation with Pinkfresh Studio for their May Embellishment Kit and today we want to inspire you using this wonderful kit. It comes in the cutest bag and includes so many great embellishments and a stamp set with a matching die created by Winnie & Walter! Look at this:


And this is a card I made with it:


I first die-cut a scalloped rectangle from yellow cardstock using Essentials: Audrey Cutaways and adhered it to a grey card. Now I die-cut a rectangle from patterned paper from the Pinkfresh Studio Up in the Clouds Collection using Essentials: Katharine Cutaways. Then I die-cut a window using the frame die and created a shaker, filling it with the heart sprinkles. After I had adhered the panel to the card, I added a yellow frame to the window and adhered the wood circle. Finally I stamped the hello, trimmed it and adhered it to the card. Here is a closer look:

I hope you liked today's inspiration! Would you like to win one of these amazing kits? Then hop to the Winnie & Walter blog and leave a comment for your chance to win one!

Thanks for stopping by today!

Vanessa