Showing posts with label winnie & walter. Show all posts

6/27/2018

Flying Corgi

Hello everyone! If there is anybody still there? It's been silent on my blog due to life! But here I am, sharing a card I made with cute Winnie & Walter products.


I first created my own stencil with the Big Balloon Cutaways and used it to create my soft background on a piece of white cardstock. After I had adhered the panel to the card base, I stamped the corgi from Dog-gone Cute with Evelin T Designs, colored it with Copics and fussy-cut the image. I die-cut a balloon from white cardstock, inked it with an ink blending tool, tied-on string to connect it to the dog and adhered both with foam tape.


Now I stamped and heat-embossed the sentiment from Sentimental: Birthday onto a strip of blue cardstock, trimmed it and adhered it to the card. Finally, I added blue enamel dots.

This dog is so adorable, don't you agree? I'll enter this card to the SSS Wednesday Challenge: Anything Goes.

Thanks for stopping by!

Vanessa

2/16/2018

Winnie & Walter 4th Birthday Bash Blog Hop


Hello and welcome to the Winnie & Walter 4th Birthday Bash Blog Hop celebrating Love & Friendship! You should have arrived from the wonderful Cheiron Brandon, if you would like to start the blog hop from the beginning, please go here to the Winnie & Walter Blog.

Without further ado, here comes my card for today's event:

I first die-cut the Cover Model: Do You See What I See? from thick white cardstock and adhered it to the card base. Now I created a colorful watercolor background and die-cut the In a Word: Friend Cutaway from it. I layered it with a word die-cut from fun foam and adhered it. Then I stamped and heat-embossed the sentiment from Parentville onto a strip of black cardstock, trimmed it and adhered it to the card. To finish the card off, I added matching sequins.

I hope you like my project for the blog hop! Now to all the fun details! Of course, there are prizes :)
There will be 4 winners picked at random from the entire blog hop which will each receive $40 credit to the Winnie & Walter Shop! Please leave your comments before February 28th, 11:59 p.m. CST. And now be sure to hop to the fabulous Amy Tsuruta.

Thanks for visiting, happy hopping and good luck!

Vanessa

12/19/2017

Advent Calendar Extravaganza with Taheerah Atchia

Hello and welcome! Today I am excited to be one of the stops of Taheerah Atchia's Advent Calendar Extravaganza :)


Advent Calendar Extravaganza is -the- festive event of the season! This ‘hop with a twist’ was dreamed up by Taheerah Atchia and features surprise destinations each day! Joining in the fun with Taheerah are ONE HUNDRED special guests - each serving up some fantastic Christmas inspiration! Just like an Advent Calendar, you’ll never know where you’re going to be visiting next until you ‘open the door’!

And that’s not all! With 25 *amazing* sponsors taking part as guests as well, your crafty wish list is bound to get a boost with a chance to win a prize EVERY SINGLE DAY!!

Join in the fun every day at taheerah-atchia.com to see what special surprises await behind the door!

Now to the card I made for today!


Because today's sponsor is Winnie & Walter, I chose to use a cute WW set for my card. The background was stamped with an old set I had in my stash, I am sorry I don't remember the company. Afterwards, I stamped the little snowman from Season's Tweetings with Evelin T Designs onto white cardstock, colored it with Copics, fussy-cut it and adhered it to the panel. Now I stamped the stars and the sentiment and adhered the panel to the card base. Finally, I added wood veneer stars.


Love my Winnie & Walter sets! If you love them, too, today is also a prize up for grabs! Here is what Taheerah says about it:

It’s not a party without a prize - and with prizes every day there are several chances to win! Today’s prize is generously supplied by Winnie & Walter so you’ll definitely want to win! Simply leave a comment on this post - then head back to taheerah-atchia.com and leave a comment there too! You must leave a comment on Taheerah’s blog as well as mine in order to be eligible to win! Don’t forget to grab the other surprise destinations from Taheerah’s blog and head over to them to leave comments there as well to improve your odds even more! You have until 23:59 EST on 31st December 2017 to enter.

Don’t forget Advent Calendar Extravaganza runs from 1st-25th December inclusive so make sure you visit taheerah-atchia.com every day for fabulous inspiration and amazing prizes every single time! Merry Christmas!

Thank you so much for visiting! 

Vanessa

11/24/2017

Winnie & Walter Free Stamp Set

Hello everyone! Winnie & Walter is offering a stamp set called In a Word: Thanks that is free with purchase (while supplies last) when you spend $35.00 after discounts are applied and prior to any shipping & handling and taxes being applied from 12:00 a.m. on Friday, November 24, 2017 until 11:59 p.m. Monday, November 27, 2017 (one per customer).

Today I have a card to share using this wonderful stamp set:

I started with a panel of white cardstock and covered it with the gorgeous new background stencil Scenery: Buffalo Check Creative Screenings. Then I applied various yellow/brown/orange Distress Inks with an ink blending tool. After I had removed the stencil, I stamped the "thanks" and the leaves and adhered the panel to the card. Now I stamped and heat-embossed the rest of the sentiment onto a strip of brown cardstock and adhered it. Finally, I added gold sequins.

Here comes some more info on the Winnie & Walter sale:


Find more details and inspiration on the Winnie & Walter Blog! Thanks for stopping by and happy shopping!

Vanessa

11/10/2017

Winnie & Walter November Release Premieres Day 4

It's the last day of our Winnie & Walter November Release Premieres, so the new Release will be available today!! This last day is full of Evelin T Design cuteness:

Here I created a little winter scene with some masking. The images from the set Winter Wishes with Evelin T Designs were colored with Copics.

For the second card, I masked off a rectangle, applied various blue and green inks with an ink blending tool and adhered the panel to the card. Then I stamped the cute image from Sweet Holiday with Evelin T Designs, colored it with Copics, fussy-cut it and adhered it. I stamped the sentiment and added matching sequins.

Super adorable sets, don't you agree? Don't miss what's happening on the Winnie & Walter Blog! Thanks for stopping by!

Vanessa

11/09/2017

Winnie & Walter November Release Premieres Day 3

Hello on Day 3 of the Winnie & Walter November Release Premieres! For today's card, I chose to play with the flowers from In Bloom: Debra's Poinsettia with Lydia Evans:

I started with a page I tore from an uninteresting book and stamped the images with Distress Inks, spritzed with water. Then I applied green ink and ink droplets. For more contrast, I outlined the images with a black marker, drew a black frame and adhered the page to the card. I stamped the sentiment from In Bloom: Victoria's Very Merry Flowers with Lydia Evans onto green cardstock, trimmed off a strip and adhered it to the card.
Finally, I added matching sequins.

Again, be sure to go to the Winnie & Walter Blog for more inspiration and fantastic give-aways!

I'll be back tomorrow for the last November Release Premiere post! Thanks for visiting!

Vanessa 

11/08/2017

Winnie & Walter November Release Premieres Day 2

Welcome to Day 2 of the Winnie & Walter November Release Premieres! I hope you like what you've seen so far! 

Here comes more inspiration:

For this gift wrap, I used Tagged: Holiday Cheer and the tags from the older Cutaways set Essentials: Noelle Cutaways. The cute snowflake button and the stickers are from Pinkfresh Studio.

Next up is a non-holiday card for every day, using Sentimental: Gift and Warm Wishes to You:

I just stamped all the hearts from the set using various colors and added matching enamel dots. Then I heat-embossed the sentiment onto a strip of black cardstock and adhered it with foam tape.

Now it's time to hop to the Winnie & Walter Blog for more samples and give-aways! I hope to see you back here tomorrow! Thanks for stopping by!

Vanessa

11/07/2017

Winnie & Walter November Release Premieres Day 1

Hello and welcome to the Winnie & Walter November Release Premieres! W&W has fabulous new products in store for you, so you'll see a lot of inspirational Christmas projects this week. Be sure to stop by the Winnie & Walter Blog for more creations from the Design Team and your chance to win the new release!

Let's get started with my first card using In a Word: Merry:

I did not receive the dies yet, so I made all my projects with the stamps only, trying to be as creative as possible. For this card, I wanted to use every single little stamp of the set - and I managed it :)

Subway Art is a great way to create modern, clean pieces. Here I stamped the various words and icons vertically and horizontally, using the classic christmas colors green and red with black. For a bit of dimension, I added matching green enamel dots.

I hope you like the first project! Don't forget to hop to the Winnie & Walter Blog to see what the other girls came up with using the new stamps, dies and stencils!

Thanks for visiting!

Vanessa

11/03/2017

Winnie & Walter November Rerun

Hello everyone! I am back with a new Christmas card for the Winnie & Walter November Rerun featuring Merry & Bright with Evelin T Designs.

Here comes a new take on the stamp set:

I trimmed a panel of dark grey cardstock slightly smaller than the white card base. Then I stamped and heat-embossed the snowflakes from Merry & Bright with Evelin T Designs and Scenery: Big Bang Flurries using white embossing powder. After I had stamped and heat-embossed the sentiment and the bow with gold embossing powder, I applied white pigment ink with an ink blending tool. I added dots with a white gel pen and adhered the panel to the card. Finally, I glued on little gold star sequins.

I hope you like my new take and that you will join us for this month's Rerun! Find all the details here on the Winnie & Walter Blog.

Thanks for stopping by!

Vanessa

9/06/2017

Winnie & Walter September Rerun: A Tree for All Seasons

Hello everybody and welcome to the Rerun of the Winnie & Walter set A Tree for All Seasons! I hope you'll join us this month!

Here comes my new card with this set:


It looks like summer left us immediately with the beginning of September, so I was in the mood to make a fall card for today.
I started with a panel of white cardstock that I had trimmed slightly smaller than the brown card base and stamped the skeleton leaf from the set repeatedly to create this pattern. Then I stamped berries and inked the panel with blue ink. I applied droplets of the ink and let everything dry. Now I tied-on the string and adhered the panel to the card.

I stamped two leaves onto white cardstock, fussy-cut them and adhered them. Then I die-cut the congrats from gold foiled cardstock and adhered it with foam tape. Finally, I added gold sequins.

I hope you like my new take on the set! Can't wait to see yours! Be sure to hop to the Winnie & Walter Blog for more samples and for all the details on our Rerun!

Thanks for stopping by :)

Vanessa

9/01/2017

Winnie & Walter August/September Release Premieres Day 4

Welcome to the last day of the Winnie & Walter Release Premieres! I have one more card to show to you today and I think it is my favorite of this week.

I used the new Evelin T Designs set Wish Big for it:


Who doesn't love a big cupcake? I started with a panel of white cardstock and stamped the cupcake. Then I masked it and applied inks with an ink blending tool to the top and the bottom of the panel. I removed the mask, colored the image with Copics and paper-pieced the liner with floral patterned paper. Then I stamped the "Celebrate" and adhered the panel to the card.

So, that was my last project of the release week. I hope you enjoyed all the cards I shared with you!

Don't forget to hop to the Winnie & Walter Blog for more information, inspiration and fun prizes! Remember, all the new products will be available today!

Thank you for stopping by!

Vanessa

8/31/2017

Winnie & Walter August/September Release Premieres Day 3

I am back for Day 3 of the Winnie & Walter Release Premieres with a modern card using Ring in the Celebration.

Here comes today's project:


I didn't have the dies before leaving for vacation, so I had to be creative using this set! I started with a panel of white cardstock and stamped the solid circles and the stars using various colors, trying to create a flow. Then I stamped the black circles and the sentiment circle and adhered the panel to the card base.

Finally, I added matching sequins to my card. This design would be great to make one layer cards, too!


I'll be back tomorrow with a last card using the new release! Thanks for visiting!

Vanessa


8/30/2017

Winnie & Walter August/September Release Premieres Day 2

Welcome back to Day 2 of the Winnie & Walter Release Premieres! Another day full of inspiration using the new products! Everything will be available for purchase on Friday, September 1.

Here is what I came up with for today:


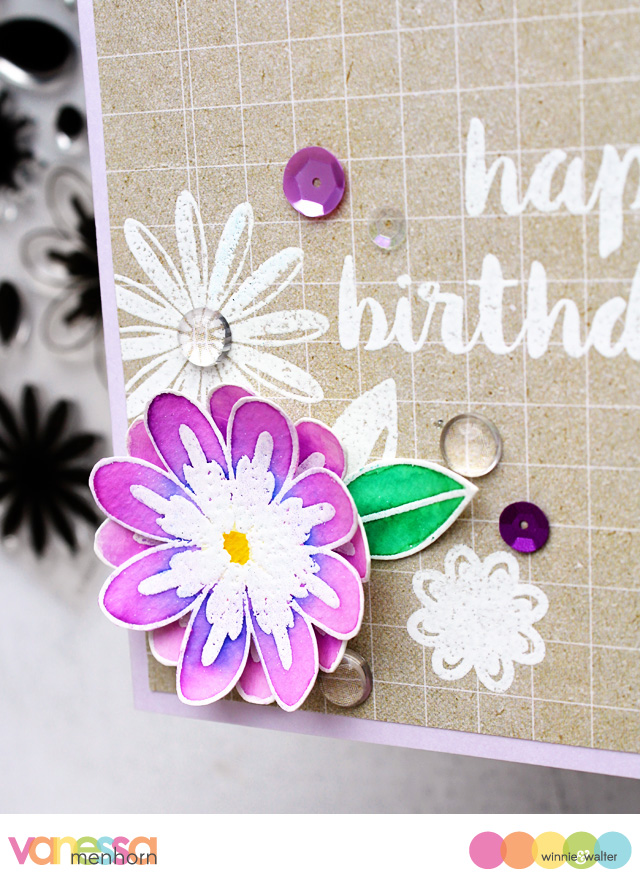
This card features the sets In Bloom: Shirley's Blooms and Happy Birthday to You.

I first trimmed a panel of Kraft/checked patterned paper slightly smaller than my card base and stamped/heat-embossed the sentiment and the images with white embossing powder. After I had adhered the panel to the card, I stamped and heat-embossed the flowers and the leaf onto watercolor paper. I colored everything with watercolor pens and water, fussy-cut it, assembled it and adhered it to the card.

Finally, I added clear droplets and sequins to my project.

Don't you love all the wonderful birthday themed products so far? It's another amazing release, don't you think? Now be sure to hop to the Winnie & Walter Blog for more inspiration and fantastic give-aways!!

I hope to see you back tomorrow!

Vanessa

8/29/2017

Winnie & Walter August/September Release Premieres Day 1

Hello and welcome to the Winnie & Walter August/September Release Premieres! It's going to be another wonderful week full of inspiration with glimpses at the new, amazing stamps and dies!

Let's get started with a vibrant word art card:

I first stamped the large "happy" from In a Word: Happy with various inks onto the front of a white cardstock panel. Then I stamped the scripty "happy" using black ink. I stamped and heat-embossed "everything" onto three strips of black cardstock, trimmed them and adhered them to the panel.


After I had adhered the panel to the card, I added matching sequins to finish the card off.

I hope you like my start of this release week! Be sure to hop to the Winnie & Walter blog for more inspiration showing off the new products and for your chance to win wonderful prizes!

I'll be back tomorrow with more :)

Thanks for stopping by!

Vanessa

7/01/2017

Baby Card

Happy weekend everyone! I am back with a baby card I made this week. My boss is a new proud father of a little son so I needed a card.

Here is what I came up with:


I trimmed a panel of patterned paper from Pink Fresh Studio slightly smaller than my card base (the card is about 15x15 cm to have enough space for all my colleagues to sign it) and adhered it to the card. Now I die-cut the letters from fun foam and blue cardstock and adhered them. I stamped the cute images onto white cardstock, colored them with Copics and die-cut them with the matching dies. After I had adhered them with foam tape, I added the stars and the heart.

I'll enter this to the current Simon Says Stamp Wednesday Challenge: Anything Goes.

Thanks for stopping by!

Vanessa

Supplies:

6/30/2017

Winnie & Walter June Release Day 4

It's the last day of the Winnie & Walter June Release Premieres already! I hope you've been enjoying all the projects with the new products! I loved creating with them :)

Here comes today's card, made with Happy Dance with Evelin T Designs:

I first created my background on a panel of white cardstock, using the new Scenery: Spotty Creative Screenings. Then I stamped the sentiment and adhered the panel to the card base. Now I stamped the image onto white cardstock, colored it with Copics, die-cut it with the matching die and adhered it to the card with foam tape. Finally, I added various sequins to finish the card off.

So, that's it! My last project for the June Release Premieres! I hope you liked all the samples! Don't forget to hop to the Winnie & Walter Blog for all the other projects made by the Design Team and to enter all the give-aways! All the new products will be available today!

Thank you for visiting!!

Vanessa

6/29/2017

Winnie & Walter June Release Day 3

On day three of the Winnie & Walter June Release Premieres, I am sharing a card made with the adorable new set Party On with Evelin T Designs.

Here is what I came up with:

I started with a card base made from PinkFresh Studio patterned paper and stamped the images from the set repeatedly onto the front. Now I die-cut the "celebrate" from The Big, the Bold and Party Cutaways from fun foam and cardstock, layered them and adhered them to the card. Then I stamped and heat-embossed the sentiments onto strips of cardstock, trimmed them and adhered them with foam tape. Finally, I added enamel dots from PinkFresh Studio.

Another fun set, don't you think? Now be sure to hop to the Winnie & Walter Blog for more inspiration and for your chance to win big!

I'll be back tomorrow for the last day of our premieres. Thanks for stopping by!

Vanessa

6/28/2017

Winnie & Walter June Release Day 2

Welcome back on day 2 of the Winnie & Walter June Release! Here comes more inspiration using the new stamps and dies.

Who doesn't love balloons? I certainly do! So I really got excited when I saw the new balloon cutaways :)

I didn't use the die-cut balloons, but created a mask from a scrap of paper and applied inks with an ink blending tool. I love that balloons look transparent when made like this. After I had made the balloons, I drew strings with a pencil. Then I stamped and heat-embossed the sentiment from Sentimental: Birthday using gold embossing powder and adhered the panel to the card. I stamped and heat-embossed the rest of the sentiment onto a strip of black cardstock, trimmed it and adhered it. Now I die-cut the bows from gold glitter cardstock and adhered them. Finally, I added matching sequins to the balloons.

You will love these cutaways, they are nesting and you get really large ones!

Be sure to hop to the Winnie & Walter blog to see more samples and for your chance to win awesome prizes!

Thanks for stopping by, I hope to see you tomorrow!

Vanessa

6/27/2017

Winnie & Walter June Release Day 1

Hello and welcome to the first day of the Winnie & Walter June Release! This release is full of lovely birthday themed products, I love all the fun new stamps and dies!

For today I made a card using the beautiful set In Bloom: Carolina's Florals with Angelica Suarez. I wanted to create a colorful watercolor card. Here is what I came up with:

I started with a panel of watercolor paper that I had trimmed slightly smaller than the card base. Now I stamped the flowers and leaves with black ink and colored everything loosely with watercolors. After the colors were dried, I stamped the "happy", inking the letters with different inks and adhered the panel to the card. Then I stamped and heat-embossed the rest of the sentiment onto a strip of black cardstock, trimmed it and adhered it. 
Finally, I added matching sequins.

This stamp set offers so many possibilities because it has solid and outlined images. Perfect for all occasions!

I hope you like my first sample! Be sure to hop to the Winnie & Walter Blog to find more inspiration, as well as great give-aways! All new sets will be available on June 30, 2017.

Thank you for visiting today, I hope to see you back tomorrow!

Vanessa

6/05/2017

Winnie & Walter June Rerun

Hello and welcome to the Winnie & Walter Rerun feature for June! This month, we are revisiting the older set Scenery: Stripes. A set with various stripes is very versatile and offers endless possibilities! Here is what I chose to do with it:

I trimmed a panel of watercolor paper slightly smaller than my card base. Then I inked the stamps with various distress inks, spritzed them with water and stamped the stripes. After everything was dried, I stamped the sentiment from Sketchy Thoughts and adhered the panel to the card. Now I added puffy stickers from Pinkfresh Studio and sequins to finish the card off.


I hope you'll join us for this month's Rerun! Find all the details and more samples using Scenery: Stripes here on the Winnie & Walter Blog!

Thanks for stopping by!

Vanessa